Hey there, fellow backcountry enthusiasts! If you’re like me, you know that a day in the backcountry is about as good as it gets. But to make the most of our adventures, staying warm and dry is key. That’s where the art of layering for backcountry adventures comes in.
Let’s break down the essentials of layering for all kinds of conditions, from bluebird days to those chilly, snow-packed adventures.
Below are some general ideas and my go-to techniques and equipment recommendations:
Base Layer: Your Second Skin
- What’s it for? Think of your base layer as your personal climate control system. It’s all about moisture management.
- Material Matters: Opt for materials like merino wool or synthetic fabrics. They wick moisture away from your skin, keeping you dry and toasty.
- Pro Tip: Avoid cotton like it’s the plague. When cotton gets wet, it stays wet, and that’s a one-way ticket to Chillsville.
- My Picks: Merino Wool is the way to go. I almost exclusively use Icebreaker. Their merino wool is tough and has the advantage of not only keeping you warm, but also fights odor so that you can carry less and wear longer. This is important if you’re doing a multiday backcountry ski/splitboard trip.
Another Icebreaker advantage: I LOVE their labeled weight system, ranging from 125 (very light for mild conditions) to 400 (ultra heavyweight and, for the most part, too much for active wear in my opinion). I stay in the 175 – 260 range, folding these in my drawer so that I can see the handy label, which lists the weight, allowing me to quickly grab the layer for the expected weather and level of activity.
Your Base Layers go on and rarely come off during the day’s workout. Here are a few of my favorites:
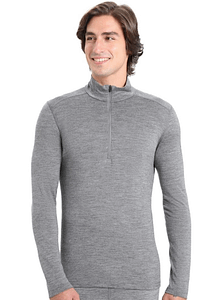
Icebreaker Merino 200 Weight Top
I love this top. It’s a good weight for active winter sports and I really like the 1/3rd zipper as it allows even more customization and venting.
I find zipping it down on steep climbs makes a huge difference in my actual, and perceived, temperature.
I go to heavier weights, often without a zipper, when I expect conditions to be extremely cold or I’m expecting to be less active throughout the day.
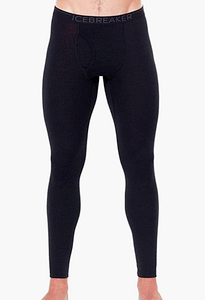
Icebreaker Merino 200 Weight Bottom
Like the Icebreaker Merino Top, the bottom accomplishes its task of keeping you warm while not adding unnecessary weight or unduly restricting movement.
By going with merino wool on your base layers, you gain the advantage of its antimicrobial properties meaning little to no odor as compared to synthetic fabrics. This becomes especially important when spending several days in the backcountry while carrying all your clothing, equipment, food, and emergency gear in a backpack.
The downside to merino: I haven’t found a brand yet that I can comfortably throw into the dryer with other clothes and expect that it’ll come out without significant shrinking. These are hang to dry only in my experience. Good news is that they do dry quickly.
Mid Layer (OR Over Layer): The Insulator
- What’s it for? This is your main source of warmth. The mid layer traps and retains body heat. You might not even need this for those warmer, bluebird days, but I very, very rarely leave my down puffy at home. You just never know, especially in the mountains, and, at only 14 ounces and packable into the size of a water bottle, I just can’t justify NOT carrying it in my pack.
- Pick Your Poison: Fleece, down, or synthetic insulated jackets are great choices. Fleece is breathable and dries quickly, while down offers unbeatable warmth-to-weight ratio. Synthetics are a happy middle ground, performing well even when wet.
- Pro Tip: Think modular. Depending on the weather, you might want a lighter or heavier mid layer. Versatility is key!
- My picks: I love down. However, because of the lack of water resistance, and complete lack of insulation when wet, I’m careful how I use it. If I expect a really wet day, which could involve either 1) rain or snow, or, 2) AND DON’T FORGET THIS, if it’s cold enough I need to wear this layer even while being active and sweating, then I might go with a fleece.
- Pro Tip: I almost always use down and will layer it over my shell (so, yes, technically it becomes an Outer Layer rather than a Mid Layer) when I need it.
This is one of the BEST TRICKS I’ve learned from a local guide. Rather than putting your Down Jacket on as a midlayer, just throw it on OVER your shell, when needed. Obviously, you wouldn’t do this in the rain, but I most often end up wearing my down jacket at the top of a climb, or the bottom, during transitions. I just pull it out of my backpack, or shell pocket, and throw it on OVER the shell. When I’m ready to start moving again, assuming it’s not cold enough to still need it, I just pull it off and put it back in my pocket or pack. This saves having to constantly take your shell off and on AND keeps in the warmth you’d lose by doing so.
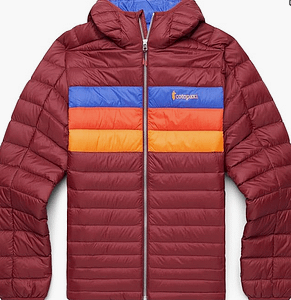
A buddy of mine recently gave me the Cotopaxi Fuego jacket (thanks Mike!!!) and I really like it. The cut is fairly roomy, so it easily goes OVER my shell, when needed, and the 800-fill down is light and really warm.
This is my first Cotopaxi item and I’m surprised at the quality considering the price can be several hundred dollars less than many other brands.
Finally, the retro style is cool! Looking good is half the battle! 😉
Shell Layer: Your Weather Shield
- What’s it for? The shell layer protects you from wind, rain, and snow. It’s your barrier against the elements.
- Go Gore-Tex or Similar: Look for waterproof and breathable fabrics. You want to keep moisture out, but also let sweat escape.
- Pro Tip 1: Ventilation is crucial. Look for shell jackets with pit zips or other venting systems.
- Pro Tip 2: NO INSULATION!!! Your shell is a barrier not an insulator. Do not buy an insulated shell for your active backcountry trips no matter how cheap it is! You will regret it and it’ll never make a backcountry trip after the first one. An insulated shell totally defeats the concept of layering and I’ve never met one that was useable for anything other than sitting around camp or riding a chair lift (and only then on the very coldest days). A shell and midlayer accomplishes the same trick while remaining completely modular and adaptable to whatever crazy mountain circumstances in which you find yourself.
- Pro Tip 3: DON’T SKIMP HERE! Serious backcountry shells will cost you, often running more than $500 for a jacket and that much or more for pants or, in my case, my go-to bibs. That said, they will last for years! My current jacket is more than 6 years old and has HUNDREDS of resort and backcountry days.
- My picks: I’ve worn most of the major brands and, honestly, you can’t go wrong with any of the industry leaders, including Arcteryx, Outdoor Research, Mountain Hardware and so on. Sometimes it comes down to fit, style or color choice.
That said, I wear Arcteryx. Their products fit me, make sense to me from a functional standpoint (ie – where pockets and zippers are placed) and are just darn tough! I’ve also availed myself of their warranty and repair services on multiple occasions and they’ve NEVER let me down.
Here are my current daily wear Shell Layers:
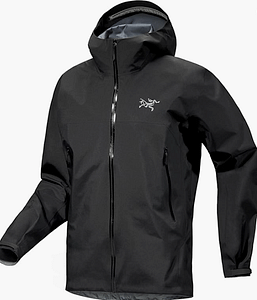
As mentioned above, I’m a huge fan of everything Arcteryx (I just can’t always afford it).
I am currently wearing the Beta jacket, but also wear an older model, the Sidewinder. I LOVED the Sidewinder as the zipper veered to the side toward the top meaning that it didn’t rub your face when zipped all the way up. However, I do find the Beta does a good job of avoiding that, too.
The jacket is well-designed for backcountry activities. Absolutely wind and water proof and the pockets are located slightly higher than normal so as to be accessible with a pack on.
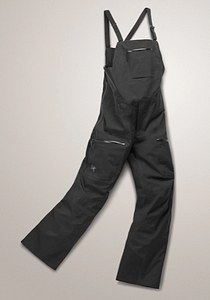
The Beta Pant is solid. However, for most backcountry adventures, I end up wearing a bib, like the Arcteryx Sabre Bib.
The Sabre is significantly more expensive, but I’m currently entering my 4th season with mine and it still looks pretty much new.
With all the different movements while backcountry splitboarding, I just find that a bib stays in place better and the slightly higher top portion keeps out powder when things get really good.
You really can’t go either way and I have buddies who absolutely do not like the bib, so hit up an REI, or a high-end ski shop, to try them on, being sure to move (bending, squatting, practice kick turning, etc.) while doing so.
Extras for the Extremes
- Neck Gaiters and Balaclavas: Great for windy or extra cold days.
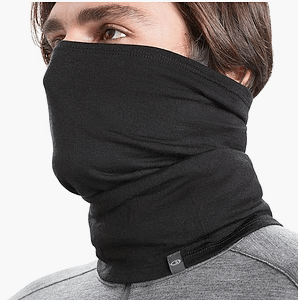
Merino wool, like in your base layers, equals, warm, quick drying, and naturally odor free.
- Extra Gloves: Because nobody likes cold, wet hands.
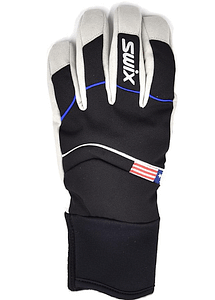
I really like SWIX Nordic gloves for my uphill efforts. They are designed to keep you warm and dry while being extremely active.
With Swix, I wear both the five-finger version, for warmer temps or harder efforts. I also wear the Swix Split Mit, their lobster claw version, on cooler days or when I might not be working as hard.
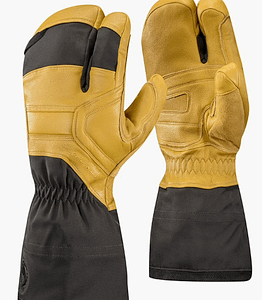
For colder days, my go to is the Black Diamond Guide Glove. I like the lobster claw version, for a little extra warmth, especially when you might be transitioning from lighter gloves and your hands might already be a bit cold and damp. However, I also use the 5-finger version and have no gripes about either model. My oldest pair of Guide Gloves is 6 years old and, while sporting a healthily worn-in patina, they are still going strong.
- Pro Tip: Carry a MINIMUM of 3 pairs of gloves. You should have 1) a lighter, preferably windproof, pair for the active (uphill) portion of your day, 2) a heavy, waterproof pair for the colder, less active (downhill or sitting around) portion of your day, and 3) a backup midweight pair in case either of the first two get wet, lost, damaged, etc.
I’ve never met anyone who could truly enjoy a day in the backcountry with cold, wet hands!!!
I’ve also found that I start with my light pair on a climb, the temperature drops and/or wind picks up, and they’re just not enough. Or, my light pair got wet enough on the first climb that they’re no good for the 2nd, 3rdor 4th lap. Either way, that third pair has saved my day many times.
Don’t forget the 3rd pair!!!
- Beanie or Helmet Liner: Heat escapes from your head, so keep it covered.
- Pro Tip: Like wearing the down jacket on the outside of the shell, this is one of my very favorite tips:
I wear a summer style baseball cap (one with mesh on the back half) and then wear my beanie OVER the hat.
This keeps sun and snow out of my eyes AND allows me to just pull off the beanie whenever I need to vent some heat. It’s not unusual for me to put the beanie on and take it off multiple times on a climb. I start off with it on, hit a steep section and pull it off, then put it back on when waiting for a buddy to catch up or traversing a flatter section. Or when the wind picks up. Trust me, it might look a little odd, but it will quickly become your personal favorite backcountry trick!!!
Fine-Tuning for Conditions
- Sunny and Mild? Maybe ditch the mid layer (stow it, don’t leave it at home or in the truck) and open those vents.
- Snowing and Cold? Layer up and seal in the heat. Make sure the down is on the inside of your shell!
- Constantly Changing? Keep your layers accessible and adjust as you go. Remember those tricks, like the beanie over the cap or the down jacket over your shell!!!
Your friends will be impressed and appreciate how fast you can adjust without slowing the entire group down. Waiting on them to catch up, after they have to disrobe and change a half dozen times in changing weather, will give you a chance to catch your breath and have a snack! 😉
Remember, the backcountry is unpredictable. It’s always better to have it and not need it, than to need it and not have it. Happy trails and stay warm out there! 🏂❄️🌞🌨
P.S. Don’t forget to pack a thermos of something warm – hot cocoa, coffee, or tea. It’s the perfect pick-me-up for those breaks in the backcountry! For my last Pro Tip, I like to carry a liter thermos of earl gray tea. It’s super nice early in the day, when it’s cold, and gives just a bit of a caffeine kick. However, as the day progresses, I thrown some clean snow in each time I take a drink, cooling it down, but also creating more water that I didn’t have to carry starting out. By the end of the day, I have a full thermos of tea (maybe a bit lighter) that’s cool and refreshing.
Cheers! 🍵🌲🏔️
Happy to discuss layering for active winter sports. Post questions below and I’ll respond to same.
Great tips-especially 3rd pair of gloves. I also like wearing a headband over my cap-keeps ears warm & still get maximum airflow on head.
Yes!!! I do think that’s a great idea. I often end up not wearing the beanie over the cap, because it’s a bit too warm, but then my ears get cold. I’ll definitely add this to the repertoire!
Very informative. Thanks you. WOW!! What a great looking Cotopaxi jacket……
Thanks Mike! Glad you enjoyed the post and the jacket!!! 😉